Spring is here & everything is waking back up…I love it!!!
In this series, I’ll cover all of my spring outdoor startups (lawn, shrubs & trees, irrigation and other outdoor spaces). Today, irrigation system start-up!
Irrigation systems are such a wonderful asset to any landscape, especially when you’re getting ready to drop some $$$ into your lawn on things like equipment to aerate, seed, starter fertilizer, lime…you don’t want it all to go to waste! So, let’s make sure the irrigation is in good working order first. So, out we go to the timer or valve box to see what winter may have done to the system. This should be a fairly easy “To Do” that can be checked off your list quickly and can be fun trying to avoid getting wet!!!
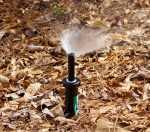
First, I like to run each zone long enough to watch every head go through it’s entire cycle to ensure adequate coverage from each head. Our system has two types of zones, gear head and spray head zones. Gear heads will send the water out in more of a stream-like fashion and are mainly used for grass areas. The spray heads do just like their name states, they send the water out in more of a misting spray and are primarily used in the beds with your flowers and shrubs…also sometimes found in natural areas.
Next, as each gear head zone runs, I use the irrigation adjustment tool to make any necessary changes to the gear heads rotation. Hopefully you kept the tool your irrigation contractor

gave you, but no sweat!!! Head down to Lowe’s or another hardware store to purchase one. In some cases, the irrigation heads can be adjusted using a screwdriver – take a look at the top of the head to see if there’s an insertion point for the tool or a screw. Sometimes during the winter, the gear heads will get out of whack and need a slight adjustment for coverage correction. Most irrigation heads will adjust in a similar way…
To make adjustments: insert the tool in the top of the head, or use the screwdriver, 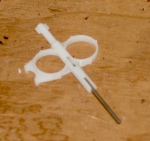 and turn it to the left or right to increase or decrease the degree of rotation. Most heads will add the additional rotation to the back side of the cycle (to the right). Because of that, you may need to adjust the starting point of the gear head (left side) by twisting the shaft of the gear head towards the left to the new starting point – make sure you do this with the rotation of the cycle to avoid stripping the gears. Then let the head (or heads) go through the entire cycle one more time to double check your adjustment(s).
Last, check your spray zones to ensure they are popping up and retracting properly. Usually they don’t get out of adjustment, but they can get dirty. If you have a spray head that is not retracting once the zone is shut off, then turn that zone back on and press the spray head down several times until it feels like it is moving freely. Doing this will help wash out any dirt or debris that is hindering the head from retracting. Or, you may have just the opposite problem where the head isn’t coming up – many times it’s because the grass has grown over that head – just clear the way and all should be good!
If you need to do some repairs, then follow these tips in how to Replace Irrigation Heads. 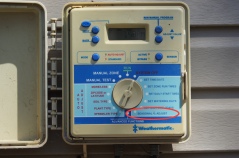 And, you’ll want to check out the Watering Schedules I use here in the Southeast as a reference. Make sure to adjust your irrigation timer for your spring watering schedule
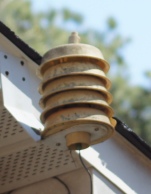
- a lot of timers have a seasonal adjustment option. Also, if you don’t have one, you may want to consider adding a rain gauge to measure the moisture, this will prevent your system from running when unnecessary.
If you have a unique system that requires alternate methods of adjusting, please post them below. As well, if you have a drip zone, let us know what you do anything to maintain those lines.
You are now ready for your next landscape retreat project Lawn Startup! Thank you! Cherie
